To have access to the Content search page to run searches and preview and export search results, an administrator, compliance officer, or eDiscovery manager must be a member of the eDiscovery Manager role group in the Security & Compliance Center. For more information, see Assign eDiscovery permissions.
On the Search page, click the arrow next to New search.
You can choose one of the following options:
Guided search: This option starts a wizard that guides you through the creating the search. The user interface to select content locations and build the search query are the same as the New search option.
New search: This option displays an updated user interface to create a search. This is the default option if you click New search.
Search by ID List: This option lets you search for specific email messages and other mailbox items using a list of Exchange IDs. To create an ID list search (formally called a targeted search), you submit a comma-separated value (CSV) file that identifies the specific mailbox items to search for. For instructions, see Prepare a CSV file for an ID list Content Search in Office 365.
The remainder of the steps in this procedure follows the default new search workflow.
Click New search in the drop-down list.
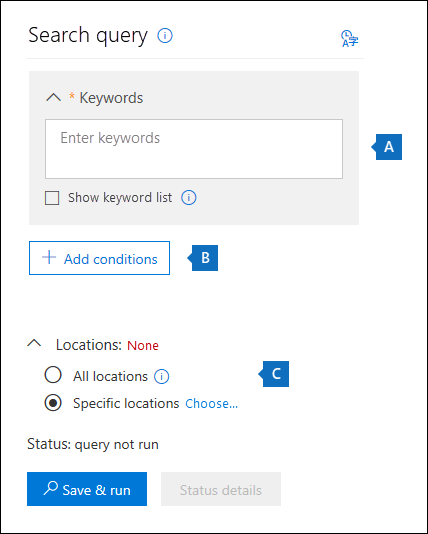
Under Search query, specify the following things:
Keywords to search for: Type a search query in Keywords box. You can specify keywords, message properties such as sent and received dates, or document properties such as file names or the date that a document was last changed. You can use more complex queries that use a Boolean operator, such as AND, OR, NOT, and NEAR. You can also search for sensitive information (such as social security numbers) in documents, or search for documents that have been shared externally. If you leave the keyword box empty, all content located in the specified content locations is included in the search results.
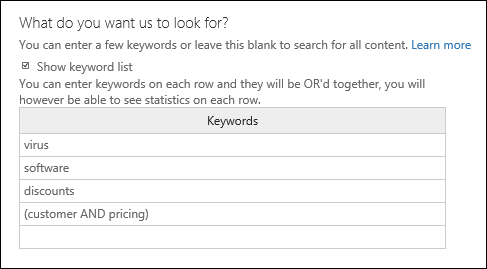
Alternatively, you can click the Show keyword list checkbox and the type a keyword in each row. If you do this, the keywords on each row are connected by a logical operator (c:s) that is similar in functionality to the OR operator in the search query that's created.
Why use the keyword list? You can get statistics that show how many items match each keyword. This can help you quickly identify which keywords are the most (and least) effective. You can also use a keyword phrase (surrounded by parentheses) in a row. For more information about search statistics, see View keyword statistics for Content Search results.
Note
To help reduce issues caused by large keyword lists, you're now limited to a maximum of 20 rows in the keyword list.
Conditions: You can add search conditions to narrow a search and return a more refined set of results. Each condition adds a clause to the search query that is created and run when you start the search. A condition is logically connected to the keyword query (specified in the keyword box) by a logical operator (c:c) that is similar in functionality to the AND operator. That means that items have to satisfy both the keyword query and one or more conditions to be included in the results. This is how conditions help to narrow your results. For a list and description of conditions that you can use in a search query, see the "Search conditions" section in Keyword queries and search conditions for Content Search.
Locations: Choose the content locations to search.
All locations: Use this option to search all content locations in your organization. This includes email in all Exchange mailboxes (including all inactive mailboxes, and mailboxes for all Microsoft Teams, Yammer Groups, and Office 365 Groups), all Skype for Business conversations, all SharePoint and OneDrive for Business sites (including the sites for all Microsoft Teams, Yammer Groups, and Office 365 Groups), and items in all Exchange public folders.
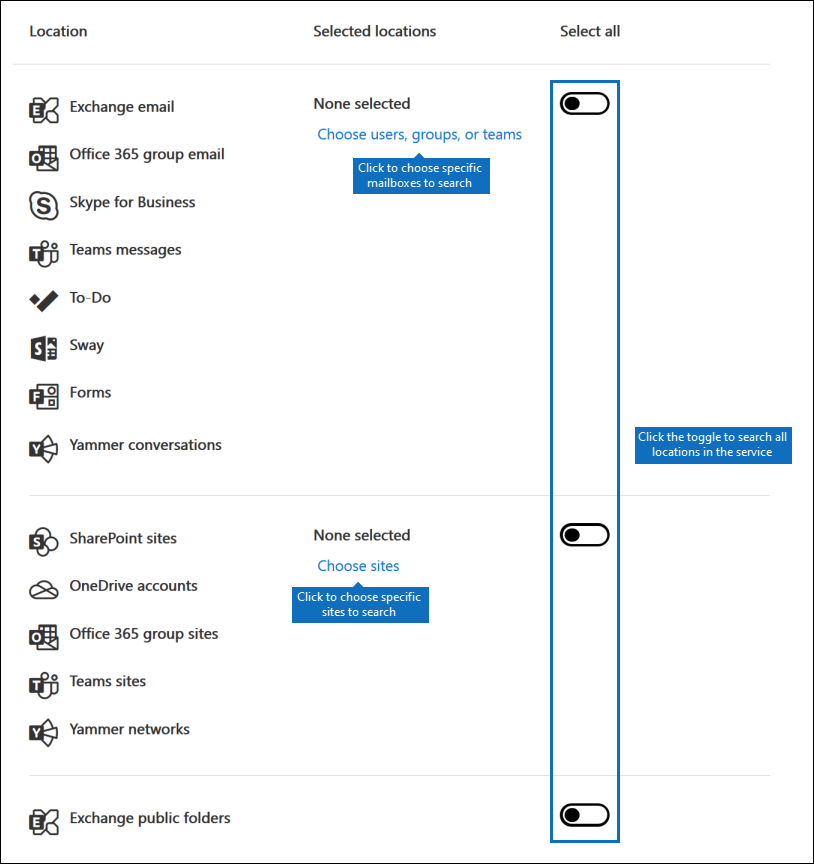
Specific locations: Use this option to search specific content locations. You can search all content locations for a specific Office 365 service (such as searching all Exchange mailboxes or search all SharePoint sites) or you can search for content in specific locations of any of the Office 365 services that are displayed.
You can also add distribution groups to the list of Exchange mailboxes to search. For distribution groups, the mailboxes of group members are searched. Dynamic distribution groups aren't supported.
Note
When you search all mailbox locations or just specific mailboxes, data from other Office 365 applications that's saved to user mailboxes is included when you export the results of a Content Search. This data won't be included in the estimated search results and isn't available for preview. It is included when you export and download the search results. For more information, see Content stored in Exchange Online mailboxes.
After you've set up your search query, click Save & run.
On the Save search page, type a name for the search, and an optional description that helps identify the search. The name of the search has to be unique in your organization.
Click Save to start the search.
After you save and run the search, any results returned by the search are displayed in the results pane. Depending on how you have the preview setting configured, the search results are display or you have to click Preview results to view them. See the next section for details.
To access this content search again or access other content searches listed on the Content search page, select the search and then click Open.
To clear the results or create another search, click New search.
Preview search results
There are two configuration settings for previewing search results. After you run a new search or open an existing search, click Individual results to view the following preview settings:
Preview results automatically: This setting displays the search results after you a run a search.
Preview results manually: This setting displays placeholders in the search results pane, and displays the Preview results button that you have to click to display the search results. This is the default setting. It helps enhance search performance by not automatically displaying the search results when you open an existing search.
There are limits related to how many items are available to be previewed. For more information, see Limits for Content Search.
For a list of supported file types that can be previewed, see Previewing search results in the "More information about content search" section. If a file type isn't supported for preview or to download a copy of a document, you can click Download original file to download it to your local computer. For .aspx Web pages, the URL for the page is included though you might not have permissions to access the page.
Also note that unindexed items aren't available for previewing.
View information and statistics about a search
After you create and run a content search, you can view statistics about the estimated search results. This includes a summary of the search results, the query statistics such as the number of content locations with items that match the search query, and the name of content locations that have the most matching items. You can display statistics for one or more content searches. This lets you quickly compare the results for multiple searches and make decisions about the effectiveness of your search queries.
You can also download the search statistics and keyword statistics to a CSV file. This lets you use the filtering and sorting features in Excel to compare results, and prepare reports for your search results.
To view search statistics:
On the Content search page, click Open and then click the search that you want to view the statistic for.
On the flyout page, click Open query.
In the Individual results drop down list, click Search statistics.
In the Type drop down list, click one of the following options depending on the search statistics you want to view.
Summary: Displays statistics for each type of content locations searched. This contents the number of content locations that contained items that matched the search query, and the total number and size of search result items. This is the default setting.
Queries: Displays statistics about the search query. This includes the type of content location the query statistics are applicable to, part of the search query the statistics are applicable to (note that Primary indicates the entire search query), the number of the content locations that contain items that match the search query, and the total number and size and items that were found (in the specified content location) that match the search query. Statistics for unindexed items (also called partially indexed items) are also displayed. However, only partially indexed items from mailboxes are included in the statistics. Partially indexed items from SharePoint and OneDrive are not included in the statistics.
Top locations: Displays statistics about the number of items that match the search query in each content location. The top 1,000 locations are displayed.
After a search is successfully run, you can export the search results to a local computer. When you export email results, they can be downloaded to your computer as PST files or as individual messages (.msg files). When you export content from SharePoint and OneDrive sites, copies of native Office documents are exported. There are also other documents and reports that are included with the exported search results. You can also export the search results report and not the actual items.
To export search results:
On the Content search page, click the search that you want to export the search results for.
On the flyout page, click More, and then click Export results. You can also export a search results report.
Complete the sections on the Export results fly out page. Be sure to use the scroll bar to view all export options.
For more detailed instructions and troubleshooting tips, see:
For a description of the limits that are applied to the Content Search feature, see Limits for Content Search.
Microsoft collects performance information for Content Searches run by all Office 365 organizations. While the complexity of the search query can impact search times, the biggest factor that affects how long searches take is the number of mailboxes searched. Although Microsoft doesn't provide a Service Level Agreement for search times, the following table lists average search times for a Content Search based on the number of mailboxes included in the search.
Number of mailboxes
Average search time
100
30 seconds
1,000
45 seconds
10,000
4 minutes
25,000
10 minutes
50,000
20 minutes
100,000
25 minutes
Building a search query
For detailed information about creating a search query, using Boolean search operators and search conditions, and searching for sensitive information types and content shared with users outside your organization, see Keyword queries and search conditions for Content Search .
Keep the following things in mind when using the keyword list to create a search query.
You have to select the Show keyword list checkbox and then type each keyword in a separate row to create a search query where the keywords (or keyword phrases) in each row are connected by the OR operator. If you paste a list of keywords in the keyword box or press the Enter key after typing a keyword, they won't be connected by the OR operator. Here are incorrect and correct examples of how to add a list of keywords.
Incorrect
Correct
You can also prepare a list of keywords or keyword phrases in an Excel file or a plain text file, and then copy and paste your list into the keyword list. To do this, you have to select the Show keyword list check box. Then, click the first row in the keyword list and paste your list. Each line from the Excel or text file is pasted into separate row in the keyword list.
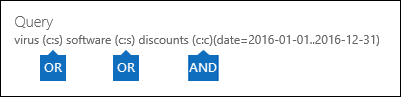
After you create a query using the keyword list, it's a good idea to verify the search query syntax to make the search query is what you intended. In the search query that's displayed under Query in the details pane, the keywords are separated by the text (c:s). This indicates that the keywords are connected by a logical operator similar in functionality to the OR operator. Similarly, if your search query includes conditions, the keywords and the conditions are separated by the text (c:c). This indicates that the keywords are connected to the conditions with a logical operator similar in functionality to the AND operator. Here's an example of the search query (displayed in the Details pane) that results when using the keyword list and a condition.
When you run a content search, Office 365 automatically checks your search query for unsupported characters and for Boolean operators that may not be capitalized. Unsupported characters are often hidden and typically cause a search error or return unintended results. For more information about the unsupported characters that are checked, see Check your Content Search query for errors.
If you have a search query that contains keywords for non-English characters (such as Chinese characters), you can click Query language-country/region and select a language-country culture code value for the search. The default language/region is neutral. How can you tell if you need to change the language setting for a content search? If you're certain content locations contain the non-English characters you're searching for, but the search returns no results, the language setting may be the cause.
Searching OneDrive accounts
To collect a list of the URLs for the OneDrive sites in your organization, see Create a list of all OneDrive locations in your organization. This script in this article creates a text file that contains a list of all OneDrive sites. To run this script, you have to install and use the SharePoint Online Management Shell. Be sure to append the URL for your organization's MySite domain to each OneDrive site that you want to search. This is the domain that contains all your OneDrive; for example, https://contoso-my.sharepoint.com. Here's an example of a URL for a user's OneDrive site: https://contoso-my.sharepoint.com/personal/sarad_contoso_onmicrosoft.com.
In the rare case of a person's user principal name (UPN) being changed, the URL for their OneDrive location is changed to incorporate the new UPN. If this happens, you have to modify a content search by adding the user's new OneDrive URL and removing the old one.
Searching Microsoft Teams and Office 365 Groups
You can search the mailbox that's associated with an Office 365 Group or a Microsoft Team. Because Microsoft Teams is built on Office 365 Groups, searching them is similar. In both cases, only the group or team mailbox is searched. The mailboxes of the group or team members aren't searched. To search them, you have to specifically add them to the search.
Keep the following things in mind when searching for content in Microsoft Teams and Office 365 Groups.
To search for content located in Teams and Office 365 Groups, you have to specify the mailbox and SharePoint site that are associated with a team or group.
Run the Get-UnifiedGroup cmdlet in Exchange Online to view properties for a team or an Office 365 Group. This is a good way to get the URL for the site that's associated with a team or a group. For example, the following command displays selected properties for an Office 365 Group named Senior Leadership Team:
To run the Get-UnifiedGroup cmdlet, you have to be assigned the View-Only Recipients role in Exchange Online or be a member of a role group that's assigned the View-Only Recipients role.
When a user's mailbox is searched, any team or Office 365 Group that the user is a member of won't be searched. Similarly, when you search a team or an Office 365 Group, only the group mailbox and group site that you specify is searched. The mailboxes and OneDrive for Business accounts of group members aren't searched unless you explicitly add them to the search.
To get a list of the members of a team or an Office 365 Group, you can view the properties on the Home > Groups page in the Microsoft 365 admin center. Alternatively, you can run the following command in Exchange Online PowerShell:
PowerShell
Get-UnifiedGroupLinks <group or team name> -LinkType Members | FL DisplayName,PrimarySmtpAddress
Note
To run the Get-UnifiedGroupLinks cmdlet, you have to be assigned the View-Only Recipients role in Exchange Online or be a member of a role group that's assigned the View-Only Recipients role.
Conversations that are part of a Teams channel are stored in the mailbox that's associated with the team. Similarly, files that team members share in a channel are stored on the team's SharePoint site. Therefore, you have to add the team mailbox and SharePoint site as a content location to search conversations and files in a channel.
Alternatively, conversations that are part of the Chat list in Teams are stored in the Exchange Online mailbox of the users who participate in the chat. And files that a user shares in Chat conversations are stored in the OneDrive for Business account of the user who shares the file. Therefore, you have to add the individual user mailboxes and OneDrive for Business accounts as content locations to search conversations and files in the Chat list.
Note
In an Exchange hybrid deployment, users with an on-premises mailbox might participate in conversations that are part of the Chat list in Teams. In this case, content from these conversations is also searchable because it's saved to a cloud-based storage area (called a cloud-based mailbox for on-premises users) for users who have an on-premises mailbox. For more information, see Searching cloud-based mailboxes for on-premises users in Office 365.
Every team or team channel contains a Wiki for note-taking and collaboration. The Wiki content is automatically saved to a file with a .mht format. This file is stored in the Teams Wiki Data document library on the team's SharePoint site. You can use the Content Search tool to search the Wiki by specifying the team's SharePoint site as the content location to search.
Note
The capability to search the Wiki for a team or channel (when you search the team's SharePoint site) was released on June 22, 2017. Wiki pages that were saved or updated on that date or after are available to be searched. Wiki pages last saved or updated before that date aren't available for search.
Summary information for meetings and calls in a Teams channel are also stored in the mailboxes of users who dialed into the meeting or call. This means you can use Content Search to search these summary records. Summary information includes:
Date, start time, end time, and duration of a meeting or call
The date and time when each participant joined or left the meeting or call
Calls sent to voice mail
Missed or unanswered calls
Call transfers, which are represented as two separate calls
It can take up to 8 hours for meeting and call summary records to be available to be searched.
In the search results, meeting summaries are identified as Meeting in the Type field, and call summaries are identified as Call. Also, conversations that are part of a Teams channel and 1xN chats are identified as IM in the Type field.
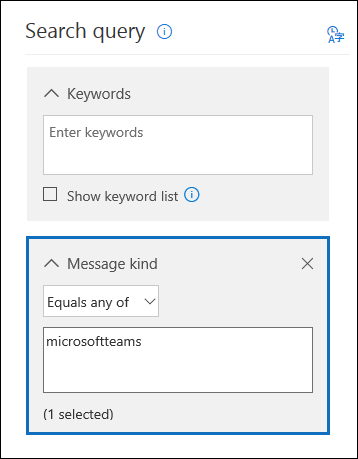
You can use the Kind email property or the Message kind search condition to search specifically for content in Teams.
To use the Kind property as part of the keyword search query, in the Keywords box of a search query, type kind:microsoftteams.
To use a search condition, add the Message kind condition and use the value microsoftteams.
Conditions are logically connected to the keyword query by the AND operator. That means an item must match both the keyword query and the search condition to be returned in the search results. For more information, see the "Guidelines for using conditions" section in Keyword queries and search conditions for Content Search.
Searching Yammer Groups
You can use the ItemClass email property or the Type search condition to search specifically for conversation items in Yammer Groups.
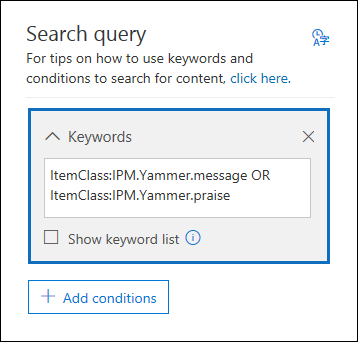
To use the ItemClass property as part of the keyword search query, in the Keywords box of a search query, you can type one (or all) of the following property:value pairs:
ItemClass:IPM.Yammer.message
ItemClass:IPM.Yammer.poll
ItemClass:IPM.Yammer.praise
ItemClass:IPM.Yammer.question
For example, you can use the following search query to return Yammer messages and Yammer praise items:
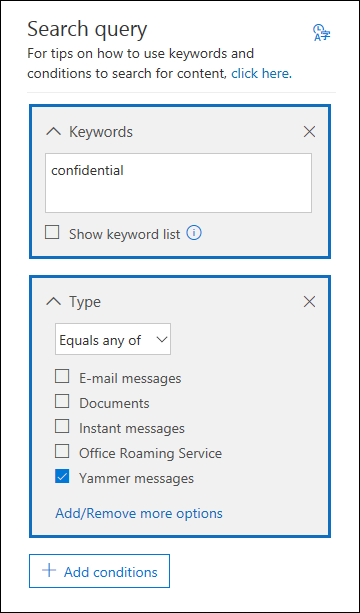
Alternatively, you can use the Type email condition and select Yammer messages to return Yammer items. For example, the following search query will return all Yammer conversation items that contain the keyword "confidential".
Searching inactive mailboxes
You can search inactive mailboxes in a content search. To get a list of the inactive mailboxes in your organization, run the command Get-Mailbox -InactiveMailboxOnly in Exchange Online PowerShell. Alternatively, you can go to Information governance > Retention in the Security & Compliance Center, and then click More > Inactive mailboxes.
Here are a few things to keep in mind when searching inactive mailboxes.
If an existing content search includes a user mailbox and that mailbox is made inactive, the content search will continue to search the inactive mailbox when you rerun the search after it becomes inactive.
Sometimes a user may have an active mailbox and an inactive mailbox that have the same SMTP address. In this case, only the specific mailbox that you select as a location for a content search is searched. In other words, if you add a user's mailbox to a search, you can't assume that both their active and inactive mailboxes are searched. Only the mailbox that you explicitly add to the search is searched.
You can use Security & Compliance Center PowerShell to create a content search to search an inactive mailbox. To do this, you have to pre-append a period ( . ) to the email address of the inactive mailbox. For example, the following command creates a content search that searches an inactive mailbox with the email address pavelb@contoso.onmicrosoft.com:
We strongly recommend that you avoid having an active mailbox and inactive mailbox with the same SMTP address. If you need to reuse the SMTP address that is assigned to an inactive mailbox, we recommend that you recover the inactive mailbox or restore the contents of an inactive mailbox to an active mailbox (or the archive of an active mailbox), and then delete the inactive mailbox. For more information, see one of the following topics:
If the Exchange Online license (or the entire Office 365 license) is removed from a user account in Office 365 or in Azure Active Directory, the user's mailbox becomes a disconnected mailbox. This means that the mailbox is no longer associated with the user account. Here's what happens when searching disconnected mailboxes:
If the license is removed from a mailbox, the mailbox is no longer searchable.
If an existing content search includes a mailbox in which the license is removed, no search results from the disconnected mailbox will be returned if you rerun the content search.
If you use the New-ComplianceSearch cmdlet to create a content search and specify a disconnected mailbox as the Exchange content location to search, the content search won't return any search results from the disconnected mailbox.
If you need to preserve the data in a disconnected mailbox so that it's searchable, you must place a hold on the mailbox before removing the license. This preserves the data and keeps the disconnected mailbox searchable until the hold is removed. For more information about holds, see How to identify the type of hold placed on an Exchange Online mailbox.
Previewing search results
You can preview supported file types in the preview pane. If a file type isn't supported, you have to download a copy of the file to your local computer to view it. The following file types are supported and can be previewed in the search results pane.
.txt, .html, .mhtml
.eml
.doc, .docx, .docm
.pptm, .pptx
.pdf
Also, the following file container types are supported. You can view the list of files in the container in the preview pane.
.zip
.gzip
Partially indexed items
As previously explained, partially indexed items in mailboxes are included in the estimated search results. Partially indexed items from SharePoint and OneDrive aren't included in the estimated search results.
If a partially indexed item matches the search query (because other message or document properties meet the search criteria), it isn't included in the estimated number of unindexed items. If a partially indexed item is excluded by the search criteria, it isn't included in the estimated number of unindexed items. For more information, see Partially indexed items in Content Search in Office 365.
Searching for content in a SharePoint Multi-Geo environment
If it's necessary for an eDiscovery manager to search for content in SharePoint and OneDrive in different regions in a SharePoint multi-geo environment, then you need to do the following things to make that happen:
Create a separate user account for each satellite geo location that the eDiscovery manager needs to search. To search for content in sites in that geo location, the eDiscovery manager must sign in to the account you created for that location and then run a content search.
Create a search permissions filter for each satellite geo location (and corresponding user account) the eDiscovery manager needs to search. Each of these search permissions filters limits the scope of the content search to a specific geo location when the eDiscovery manager is signed in to the user account associated with that location.
Tip
You don't have to use this strategy when using the search tool in Advanced eDiscovery. That's because all datacenters are searched when you search SharePoint sites and OneDrive accounts in Advanced eDiscovery. You have to use this strategy of region-specific user accounts and search permissions filters only when using the Content Search tool and running searches associated with eDiscovery cases.
 Главная
 New search.
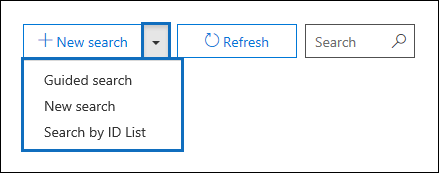
 New search.
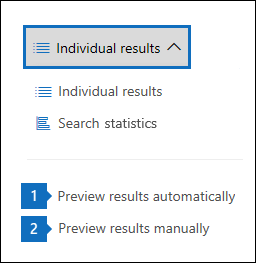
 More, and then click Export results. You can also export a search results report.
 and select a language-country culture code value for the search. The default language/region is neutral. How can you tell if you need to change the language setting for a content search? If you're certain content locations contain the non-English characters you're searching for, but the search returns no results, the language setting may be the cause.
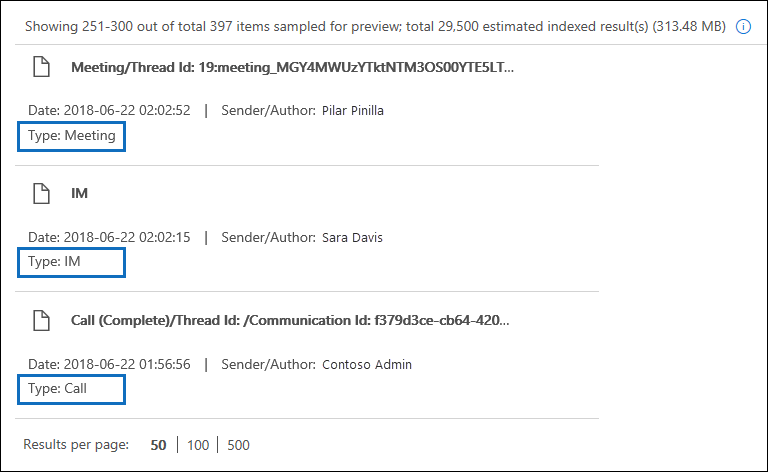

 > Inactive mailboxes.